CNC machining tolerances are not just technicalities; they are the lifeblood of precision manufacturing. They determine the quality, functionality, and compatibility of the final products. Whether it's in the aerospace, automotive, medical device, or countless other industries, understanding and effectively managing tolerances is the key to delivering outstanding results.
At its core, tolerance in CNC machining represents the allowable deviation from a pre - specified dimension, measurement, or geometric feature. It serves as a set of boundaries within which a machined part must fall to be considered acceptable for its intended use. This deviation can pertain to linear dimensions, angles, shapes, or surface finishes. For example, when machining a shaft, the diameter might have a specified tolerance of ±0.01 mm, indicating that the actual diameter of the shaft can be within 0.01 mm above or below the nominal value.
-
Ensuring Precision and Quality: By strictly adhering to tolerances, manufacturers can guarantee that the finished products meet the exacting specifications required for optimal functionality. In the aerospace industry, where a small deviation can have catastrophic consequences, tight tolerances are non - negotiable for components like engine parts.
-
Enabling Interchangeability: Tolerances play a crucial role in making parts interchangeable. In automotive manufacturing, for instance, parts such as pistons and cylinders need to fit together seamlessly. Precise tolerances ensure that any piston of a particular model can be used in any corresponding cylinder, facilitating mass production and easy repairs.
-
Balancing Cost - Efficiency: While tighter tolerances often result in higher - quality products, they also come with increased costs. Tighter tolerances demand more precise machining processes, often involving slower speeds, more frequent tool changes, and advanced measuring equipment. Therefore, finding the right balance between tolerance and cost - effectiveness is essential for the economic viability of a manufacturing project.
-
Straightness: This tolerance is concerned with the deviation from a perfectly straight line. For components like shafts used in motors or linear guides, maintaining straightness within a narrow tolerance range is crucial. A deviation in straightness can lead to increased friction, reduced efficiency, and premature wear.
-
Flatness: Flatness tolerance defines the allowable variation in a flat surface. In applications such as the mating surfaces of engine blocks or optical tables, flatness is essential for ensuring proper contact and functionality. A surface that is not flat within the specified tolerance may cause leaks in a fluid - filled system or affect the accuracy of optical devices.
-
Roundness: Roundness tolerance is all about the circularity of a part. Components like bearings, which rely on smooth rotation, must have a high degree of roundness. Deviations from the ideal round shape can cause uneven wear, noise, and reduced bearing life.
-
-
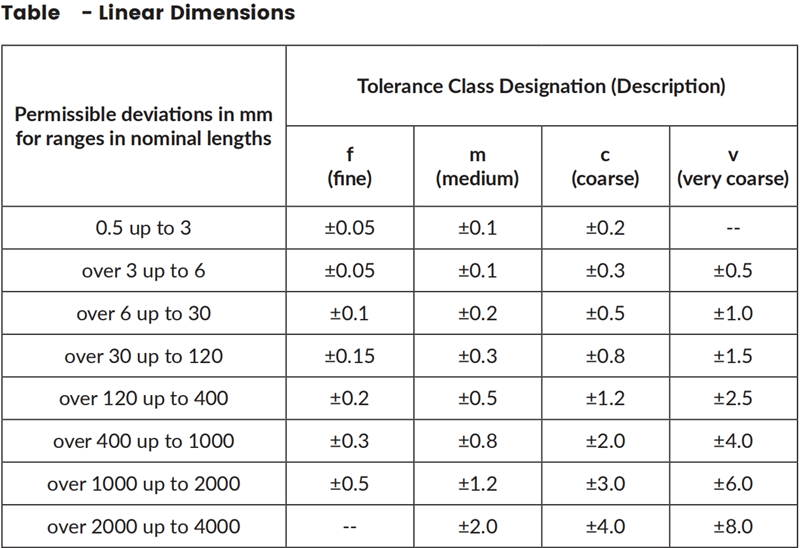
Size Tolerance: The most fundamental form of tolerance, size tolerance sets the acceptable range of variation in the size of a part. It is typically denoted by a “+/-” symbol followed by a numerical value. For example, a bolt might have a size tolerance of ±0.05 mm, indicating the allowable deviation from its nominal diameter.
-
Hole Tolerance: Hole tolerances are of utmost importance as they ensure proper fits for bolts, screws, and other fasteners. In a mechanical assembly, the hole diameter must be within a specific tolerance range to allow for easy insertion and secure fastening of the fasteners.
-
Positional Tolerance: This tolerance determines the allowable deviation in the location of features such as holes or slots relative to a reference point. In printed circuit boards, for example, the precise positioning of holes for component insertion is critical, and positional tolerance ensures that components can be accurately mounted.
-
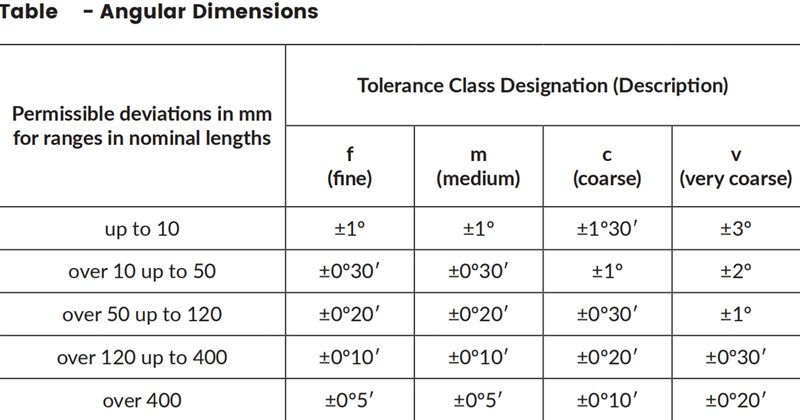
Angularity: Angularity tolerance specifies the permissible variation in the angle of a feature with respect to a given reference. In machinery where components need to be at specific angles for proper operation, such as in the linkages of a robotic arm, angularity tolerance ensures accurate movement and functionality.
-
Parallelism: Parallelism tolerance ensures that two surfaces or axes remain parallel within the specified limits. In precision - engineered structures like the guideways of a milling machine, parallelism is crucial for smooth and accurate movement of the cutting tool.
-
Perpendicularity: Perpendicularity tolerance dictates the allowable deviation from a 90 - degree angle between two surfaces or features. In the construction of precision - machined frames, maintaining perpendicularity is essential for the overall stability and functionality of the structure.
-
-
Profile of a Line: This tolerance controls the form of a single - line element, ensuring that it conforms to the specified shape. In the machining of complex contours, such as the edges of a custom - designed mold, the profile of a line tolerance ensures that the final shape matches the design intent.
-
Profile of a Surface: Profile of a surface tolerance manages the shape of an entire surface within a defined boundary. For components with complex surface geometries, like the blades of a turbine, this tolerance is vital for ensuring optimal performance.
- Circular Runout: Circular runout tolerance focuses on the variation in circular features, such as the outer diameter of a cylindrical part. In a rotating shaft, circular runout can affect the balance and smoothness of rotation. High circular runout can lead to vibrations, noise, and increased stress on the shaft and its supporting components.
- Total Runout: Total runout tolerance takes into account the entire part and ensures that all features are within the specified limits. It is a more comprehensive measure of the part's overall geometric accuracy and is crucial for components that require high - precision rotation, such as the spindles of a machine tool.
Steps for Figuring out Tolerance:
-
Understand part's usage and application requirements:
-
Identify key parameters: First, I identify the key parameters affecting the component’s function, such as mating surfaces, alignment, and fit with other DNA molecules.
-
Set baseline tolerances:
-
Use customer-provided norms and figures: In setting the baseline tolerances, using different norms and figures provided by the customer is absolutely necessary.
-
Understand material properties:
-
Example: After that, I try to understand what properties the materials have; for example the harder materials tend to be able to take a bit more pain on the tolerance than perhaps a soft plastic.
-
Utilize relevant tools:
-
Software simulations and programs: Employing such tools as software simulations or advanced computer programs indicates the conditions under which certain tolerances would be used and what outcome could be expected.
The intended function of the machined part is a primary consideration when choosing a tolerance. For example, in a medical device like a syringe pump, components that control the flow of fluids need to have very tight tolerances to ensure accurate dosing. On the other hand, a non - critical structural component in a consumer product may be able to tolerate a wider range of variation.
The capabilities of the CNC machining equipment and the expertise of the machinists are significant factors. High - end CNC machines with advanced control systems and precision - ground components can achieve tighter tolerances. However, older or less - sophisticated machines may have limitations. It's essential to have an in - depth discussion with the machining team to understand what tolerances are realistically achievable.
As mentioned earlier, tighter tolerances generally come with higher costs. The machining process may require more time - consuming operations, such as multiple passes with a smaller cutting tool, or more frequent tool changes to maintain accuracy. Additionally, more accurate measuring equipment and quality control procedures are needed. Therefore, it's crucial to balance the need for precision with the available budget.
Different materials have different characteristics in terms of dimensional stability and machinability. For example, metals like aluminum are relatively easy to machine and may tolerate a slightly wider range of tolerances compared to harder metals like tungsten carbide. Some materials may also be more prone to thermal expansion or contraction, which can affect the final dimensions of the machined part.
Consider how the machined part will fit into the overall assembly. If the part is part of a complex assembly where multiple components interact, tight tolerances may be required to ensure proper fit and function. However, if the part is a stand - alone component or has a relatively loose fit within the assembly, a wider tolerance may be acceptable.
In the aerospace industry, precision is non - negotiable. For example, the turbine blades in an aircraft engine are subject to extreme temperatures and mechanical stresses. Tight tolerances are required in their manufacturing to ensure efficient combustion, proper air - flow, and overall engine performance. A deviation in the shape or dimensions of a turbine blade can lead to reduced engine efficiency, increased fuel consumption, and even engine failure.
Automotive manufacturing requires a careful balance between precision and cost - effectiveness. Components like engine pistons and cylinder bores need to have tight tolerances to ensure proper combustion and power output. At the same time, manufacturers need to produce these parts in large quantities at a reasonable cost. Tolerances are also crucial for components like transmission gears, where precise meshing is essential for smooth operation.
The medical industry places a high premium on safety and effectiveness. In the production of surgical instruments, for example, tight tolerances are required to ensure proper functionality and sterility. Implantable medical devices, such as hip replacements or pacemakers, must be manufactured with extreme precision to fit the patient's anatomy and function correctly over an extended period.
Open and effective communication between the design, engineering, and machining teams is essential. Designers need to clearly specify the tolerance requirements in the design drawings, and engineers and machinists should be able to provide feedback on the feasibility of achieving those tolerances. Regular meetings and discussions can help prevent misunderstandings and ensure that everyone is on the same page.
Designers should always keep manufacturability in mind when creating part designs. Avoiding overly complex features or geometries that are difficult to machine within the specified tolerances can save time and cost. For example, using rounded corners instead of sharp angles can make the machining process easier and more accurate.
Implementing robust quality control processes is crucial for verifying that machined parts meet the tolerance requirements. This can include using precision measuring instruments such as coordinate measuring machines (CMMs), calipers, and micrometers. Regular inspections at various stages of the machining process can help identify and correct any issues before the part is completed.
The manufacturing industry is constantly evolving, and there is always room for improvement. Manufacturers should continuously assess and refine their machining processes to achieve tighter tolerances while maintaining cost - effectiveness. This can involve investing in new equipment, training machinists on the latest techniques, and implementing advanced quality control systems.
Whether you're involved in aerospace, automotive, medical device manufacturing, or any other industry that demands precision, the proper application of CNC machining tolerances is essential for success. Contact Bomei Machining for your next projects, Bomei will always do our best to meet your design and manufacturing needs. Our company mission is to help your ideas come to life!


 Evan Xiao